The Ultimate Guide to Sharpening Woodworking Chisels
A dull chisel ruins your work and causes accidents. Here's a foolproof, step-by-step method to get a razor-sharp edge on your tools using basic water stones.

Why a Sharp Chisel is Your Best Friend
There's an old saying in woodworking: “A dull tool is a dangerous tool.”
When your chisel isn’t sharp, you have to force it through the wood. That force leads to slipping, which ruins your workpiece—or worse, ends up sending you to the emergency room.
A razor-sharp chisel, on the other hand, should glide through pine or oak like butter. It leaves a glassy, smooth surface that no sandpaper can match.
If you've been struggling with tear-out or sloppy joints, don’t blame your skills just yet. Blame your edges. Today, I'm going to show you the exact method I’ve used for over three decades to keep my tools in top shape.
Sharp chisels matter most for joinery work — especially mortise and tenon joints that demand razor-sharp chisels to achieve the tight tolerances that make furniture last centuries without glue.
What You Need to Get Started
You don't need a $500 motorized sharpening system. All you need is patience, practice, and a few basic supplies:
- A flat surface: A piece of thick float glass or a granite surface plate.
- Sharpening medium: I prefer a dual-grit water stone (typically 1000/4000 grit or similar) or diamond plates.
- A honing guide: Optional for veterans, but mandatory for beginners to hold the correct angle.
- Water or lapping fluid: Depending on your stone type.
- A leather strop and honing compound: For the final polish.
Keep a dedicated spray bottle with water near your sharpening station. Water stones need to be soaked before use and kept wet to float away the metal swarf.
Step 1: Flattening the Back (The Foundation)
Most beginners grab a new chisel, sharpen the slanted part (the bevel), and wonder why it doesn't cut well.
Here is the secret: If the flat back of the chisel isn't perfectly flat, the cutting edge will never be sharp. The edge is just the intersection of two planes (the back and the bevel). If one plane is curved, the edge is curved.
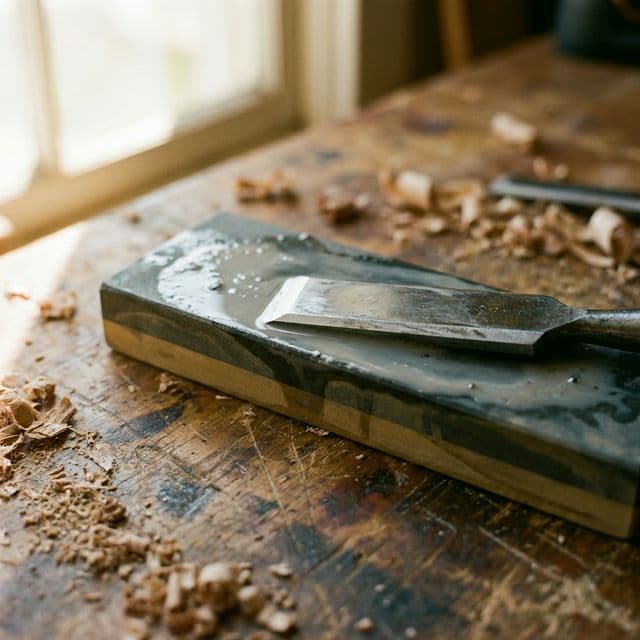
- Soak your stones for about 10-15 minutes.
- Lay the back of the chisel completely flat against your coarsest stone (start around 1000 grit). Do not lift the handle at all.
- Using even pressure, rub the back up and down the stone.
- Keep checking the scratch pattern. You only need to flatten the first 1 to 2 inches of the blade nearest the edge.
- Once you have an even, flat scratch pattern across the entire width behind the edge, move to your higher grit stone (4000+) and repeat until it shines like a mirror.
You only have to flatten the back of a chisel once in its lifetime. Take your time on this step.
Step 2: Grinding the Primary Bevel
Now we address the angled side. Most chisels are ground at either 25 or 30 degrees.
- Lock your chisel into your honing guide. Use a protractor or the guide’s built-in measurements to set the blade projection for your desired angle (I recommend 25 degrees for a primary bevel).
- Place the edge on your coarse stone.
- Apply pressure down towards the edge, and push forward and backward. Focus on using your whole upper body, locking your arms to keep the angle steady.
You are looking to create a fresh, flat surface along the entire bevel. Check the edge frequently. You’re done when you can feel a tiny "burr" (a microscopic lip of metal) rolling over onto the flat back side.
Step 3: The Micro-Bevel (The Cutting Edge)
We don't actually polish the whole 25-degree bevel. That takes too much time. Instead, we create a "micro-bevel" right at the tip.
- Adjust your honing guide slightly so the angle increases by about 2 or 3 degrees (e.g., to 28 degrees).
- Move to your highest grit stone (4000 to 8000 grit).
- Take 5 to 10 firm strokes on the fine stone.
Because the angle is slightly steeper, you are only polishing the very tip of the blade. It saves you an enormous amount of work and creates an incredibly strong, razor-sharp edge.
Do not use excessive downward force on the high-grit stones. Let the abrasive do the cutting. Pushing too hard can gouge the soft stone and ruin your edge.
Step 4: Removing the Burr and Stroping
You've sharped the micro-bevel, but if you look closely, there is still a tiny wire edge (the burr) clinging to the flat back of the chisel.
- Remove the burr: Lay the back of the chisel perfectly flat on your finishing stone and give it three light side-to-side swipes. Never tilt the blade.
- Strop the edge: Take your leather strop, loaded with green honing compound.
- Pull the bevel backwards across the leather about 10-15 times. (Never push forward, or you'll slice the leather in half!).
- Flip it and pull the flat back across the strop a few times.
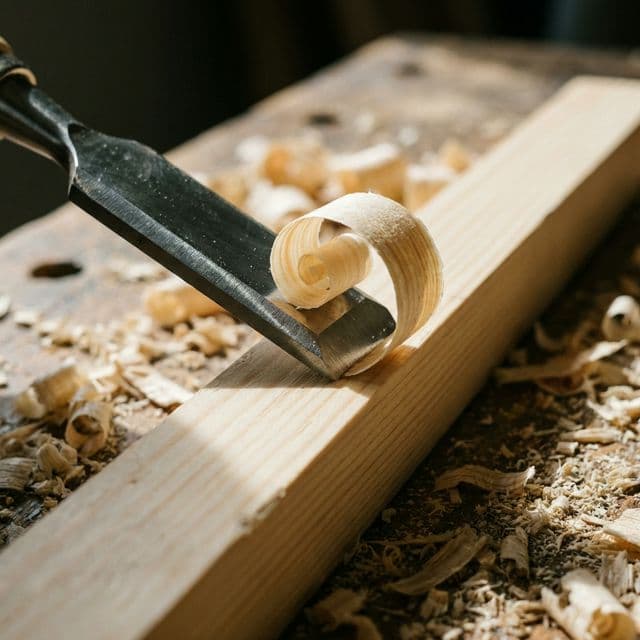
The Final Test
How do you know you're done? Don't test it on your thumb.
Grab a piece of scrap pine (softwoods reveal dull tools easily). Try pearing the end grain. If the chisel leaves a shiny, smooth surface with virtually no resistance, congratulations—you have a sharp tool.
When you start tearing grain again, you don't need to rebuild the primary bevel. Just touch up the micro-bevel on your finest stone and strop it. The touch-up should take less than 60 seconds.
Once your chisels are sharp, the next step is putting them to work on projects that actually demand precision — projects designed for specific chisel work that develops your technique include step-by-step assembly sequences where you'll feel the difference a sharp edge makes on the very first cut.
Keep your edges sharp, and your fingers out of the way.
– Mark